Intro
One thing that is quintessentially British is that some people don't just use things straight from the box. They create their own, sometimes incredible masterpieces. For example, people building cars in their garage, guitars in their sheds, trikes in their front rooms or in my case, building speakers in my workshop.
When I was 16 and doing a YTS in carpentry, I decided I wanted to build a pair of speakers. I already had a pair of hi-fi speakers and I decided to build some bigger boxes for them. After I bought my first PA, 2 years later, I used my carpentry skills and what I had learned about building speakers to upgrade and expand my system.
|
|
Building some compact full range PA speakers
More recently I decided to build some speakers which were multi purpose. I liked the versatile design of the Nexo PS15 as it was very compact, they could be mounted on stands, be used as wedge monitors or be flown from a truss using flying frames. In addition, everyone was using them at the time. I decided to build some of my own cabinets, because of all the reasons above, but mostly because they would fit in a flying frame. I decided to call them the XL15.
|
|
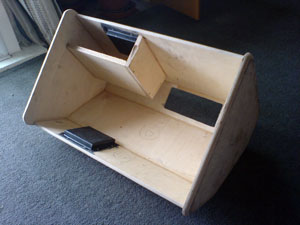
Planning the woodwork
The port has a large area and depth, especially compared to it's size. I calculated the Thiele-Small parameters using a few popular 15" drivers. These were the ones I was thinking of using and realised the results of the Thiele-Small calculations seemed to be very similar for all the drivers as if acting as a universal port. So instead of changing the port size or depth to suit the driver, I decided to keep it as it was and then choose the appropriate 15" driver by experimentation.
I worked out a cutting plan by drawing the panels to scale on the computer and rearranging them until I realised I could get 2 cabinets out of 1 sheet of 8ft x 4ft Ply. I used 18mm Birch Ply as it is extremely strong, has a good finish and is the best material to use for making speaker cabinets.
|
|
Building the cabinets
I decided, just like the Nexo PS15 that the grille would be held on with magnets. I had the grilles made up by Penn Fabrication and I realised I had to make the handle interior dishes out of metal myself and install before assembling the cabinet because I wouldn't be able to access them once it was assembled. I glued and screwed the ply together for maximum strength and rigidity. |
|
Selecting the drivers
I tried out a few different 15" drivers, thanks to Audio Forum in Bristol - they lent me a few different types and makes. I really liked the Precision Devices (PD) 15BR40. It is lightweight due to the new neodymium magnet, has a cast chassis, is about 750watts and it sounded good in the cabinet. I was thinking of using a PHL driver as they do in the original PS15 but there were problems sourcing the drivers and re-cone kits where as the PD was easily available. I wanted a 2" throat HF driver and tried the recommended B+C DE85TN.
Afterwards I realised that the B+C DE750TN had a similar titanium diaphragm but had a much better phase plug and was generally better constructed. They only just fitted inside the cabinet with the compact Beyma TD360 horn and they cost considerably more but sounded noticeably better so I decided to use them.
|
|
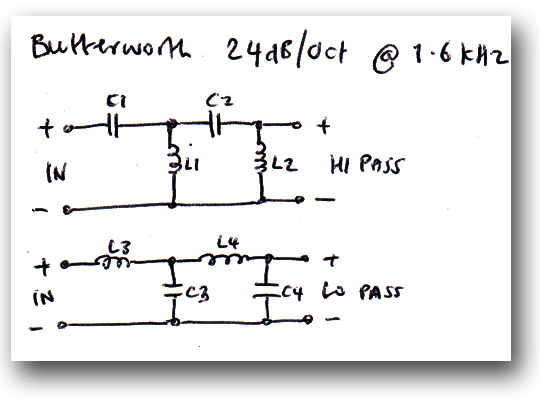
Designing the crossover
I then needed a crossover as I wanted to run them passive. I temporarily wired one cabinet active and started to experiment. Thanks to Sonix in Bristol, they let me use some top quality equipment to do this and at the same time to make a direct A-B comparison to the Nexo PS15. I ran a CD on a professional Sony CDP-D11 CD player, through a Midas Heritage 1000 desk, and then into the Klark Teknik DN9848E active crossover into a QSC PLX amplifier. As well as using my ears, I used a BSS FCS-926 Varicurve and a flat mic to measure the response. I tried many different crossover frequencies and slopes but the best one was a standard 1.6kHz. I liked the Butterworth -24dB per octave slope on both bands. At this point I compared it to the Nexo PS15 without it's processor and to me the PS15 sounded thin and honky. Mine definitely sounded a lot better. It was as if Nexo had built the cabinet and then made heavy corrections with the processor. I had managed to get the cabinet to sound as good as possible on it's own without having to correct it too much with EQ. I preferred the sound of my speaker with a little bit of EQ to the PS15 with the processor. So now I was satisfied that I needed a 1.6kHz crossover. |
|
Building the crossover
There are some reasonably priced 1.6kHz passive crossovers available, from companies such as Beyma. One problem with passive crossovers is that they are usually only rated at 400 - 500 watts. Another problem I have found is that components mounted on a printed circuit board (which are housed inside a box behind a powerful bass driver which is physically thumping away) tend to work loose, possibly also resulting in damage to the drivers. At this point I spoke to Bath-based Neil Perry from Raw State, an amazing brain, service technician and eccentric Englishman who has, in the past, built his own car and specialises in top end and vintage audio equipment. He also installed the original Real World Studio and Moles Studio in Bath. The best person to help me with the technical side of things. I overcame the crossover problems by building my own, using huge 'supersound' capacitors and large induction coils to take the power. Neil suggested that mounting the components on a piece of ply and then using tag strip to connect them together (just like they used to do with the valve amplifiers) would overcome the problems of the components working loose and would also make them easily serviceable. As I wanted a -24dB slope on both bands I had to use 4 capacitors and 4 coils on each crossover which again pushed the budget up but I wanted the best. After I had built them, Neil tested them to give an accurate picture of their behaviour. |
|
Tweaking the HF
When you build a passive crossover the HF (High Frequency) has to be attenuated, typically by around -10dB. I wasn't sure exactly how much so I experimented further. I wired in a 'T'-pad attenuater to the HF. This way, I could manually turn the HF up and down without changing the crossover characteristics. The 'T'-pad was calibrated. I then used the speakers on a tour. I could tweak the HF until I was happy with the HF level in a real situation. The end result was around -9dB so I made a fixed resistor network to complete the passive crossover. I made up a new input connector plate, (without a hole for the 'T'-pad), got it powder-coated and bolted the Speakon NL4's to it to complete the project. |
|
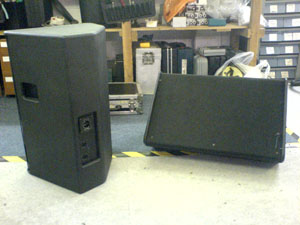
Building bass bins
Although the above speakers are full range, it's generally recognised that it is much better to have a separate Bass speaker for a PA system and to run it at least 2-way active ie. with a separate amp for the bass and one for the rest. It's also good if the bass speaker has at least an 18" driver. Someone I know well has a D+B C7 system; 2xC7 tops and 2xC7 subs a side. He also has a pair of C7 sub copies which contain a Beyma G550 18" speaker. I've heard them and like the sound of them and I like the simple and compact design of the cabinet. They are also not too heavy, so I decided to build some of these. This would also allow me to hire the other cabs my friend has if I need extra or he could hire mine if needed. I found some castors and handles which were very similar to the original C7's and built them as close to the originals as I could so that mine wouldn't look odd next to the genuine ones.
|
|
Powering the speakers
I bought some QSC PLX 3402 amplifiers. They are high quality industry standard amplifiers. I have owned some before, but the PLX 1602 version (which are not so powerful) so I already knew these amplifiers are very versatile and reliable, sound good and are lighter than a standard amplifier. I bought the 3402 version because I managed to get some used ones and they match the power needed for the full range speakers and subs I built.
The BSS FDS-336 is used for system processing including running it 2 or 3 way, using delays, for EQ and limiting to protect the system.
|
|